Fairy Tale Word Wall Headers (plus Bonus Items) to transform your classroom into a Fairy Tale land. Click on the link below for more details.
Tag: Teaching
Do’s and Don’ts for Word Walls
Thinking about creating a word wall?
Wanting to use your word wall more effectively?
Not sure how to use a word wall?
Every elementary classroom should have one. Read on to learn how to use yours effectively.
8 Do’s for Word Walls
- Do put it where students can reach all words
- Do begin with a blank word wall
- Do add words as you work on them
- Do interact with the wall daily
- Do teach students to use it as a resource for writing
- Do pull words off to create sentences
- Do let students “teach” using pointers and slappers
- Do have fun with it
8 Don’ts for Word Walls
- Don’t put it near the ceiling
- Don’t put up all the words before the 1st day
- Don’t put up words without students
- Don’t ignore the word wall
- Don’t forget about the word wall
- Don’t treat it like a decoration
- Don’t forbid students to touch it
- Don’t be afraid to use it
Let’s talk about Word Walls! I have been teaching long enough to remember when Word Walls were something new. They were originally part of a program called “4 Blocks” by Patricia Cunningham. I remember getting the training and being excited about using a Word Wall in my classroom. Since then they have become a mainstream component of elementary classrooms. Unfortunately, not everyone is using them to their full advantage. With very little effort, a Word Wall can be a powerful tool for student learning.
I have provided you with a quick list of Do’s and Don’ts for Word Walls. Let’s dig a little deeper into the Do’s and look at how to use the walls effectively.
-
Do put it where students can reach all words
Dedicate a wall in your classroom. I have taught in many sizes and shapes of rooms too so I know it can be a challenge because of activboards, doors, windows, computer hookups, etc. However, there is always one wall that can be used. A large bulletin board can work too. For the wall to be effective, students need to be able to see it, touch it and get up close to it. If you look closely at this picture you will see that some of the lower letters are not crisp and smooth because they have been touched and rubbed against as students worked around the word wall. A Word Wall is a tool it is not going to stay clean and neat all the time. And that’s okay!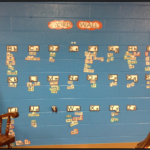
2. Do begin with a blank Word Wall
It’s tempting to go ahead and put it all up during preplanning. Don’t do it! Put up the labels and if parents question you during open house tell them “We will put up the words together in class as a learning activity!” Here is a picture of a little sweetie (clipart mask hides her true identity;) on the first or second day of school. Notice the blank Word Wall behind her.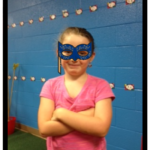
3. Do add words as you work on them
Incorporate sight words into your ELA lesson. It’s a standard and you are going to cover it anyway so be systematic about it. In kindergarten, teach a word, put it on the word wall and then practice writing it and using it in sentences. In first grade, put up the kindergarten “popcorn” words quickly in the first few days and then add others each week or as needed. In second grade, the first three Dolch lists will go up quickly because they should have been learned in first grade. You might focus more on adding math and science words as you learn them. But leave the sight words up there, many students will need them for spelling in their writing throughout second grade.
-
Do interact with the wall daily
Use the Word Wall everyday. Some days you might conduct an entire lesson using the Word Wall. Other days, it might just be a sponge activity while students are washing hands for lunch.
-
Do teach students to use it as a resource for writing
“Teacher, how do you spell…..?” The spelling issue can fatally disrupt the writing process for many students. By teaching them to use the Word Wall (and accompanying personal dictionary; if you like…) you can eliminate many of these problems. Students enjoy being independent and the process of looking for and finding the word on the Word Wall and then writing it is conducive to long term memory storage. Win. Win.
-
Do pull words off to create sentences
Physically pulling the words off the Word Wall to create sentences helps students experience the meaning of each individual part and see how they work together as a whole. Best practice; ask students to pull the words off and see what they can do! I will never forget little Jose who after a similar lesson in my first grade classroom, used the Word Wall to write the sentence “I like my teacher.” It was the first sentence he had ever written! He cut it out of his journal and gave it to me. I still have it taped to my pencil holder. That was just the beginning for little Jose and many others who were energized by the power to create meaning with words!
-
Do let students “teach” using pointers and slappers
I allow students to use pointers and slappers during whole class work with the Word Wall but I also have the Word Wall as a center during literacy centers. I have to model this at the beginning of the year, but it is always a favorite with my students. Here is a picture of a sassy little teacher going to town. See the feet of her “student” in the rocking chair to the left. Both students are engaged and learning. 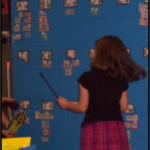
Consider this: when a child says “Let me see..” they always hold their hands out to touch the thing they want to see. We “see” things better when we touch them. Allow your students to touch the words and the pointers and fully experience the Word Wall.
*a slapper is a flyswatter used to slap words. It’s very fun:)
- Do have fun with it Sing the words, dance while you read them. Have fun! Want more ideas for ways to have fun with a Word Wall? Stay tuned for an upcoming product called Fun With Word Walls. Follow me on https://www.teacherspayteachers.com/Store/Julie-Alderson-Foster to receive notifications when I post new products!
